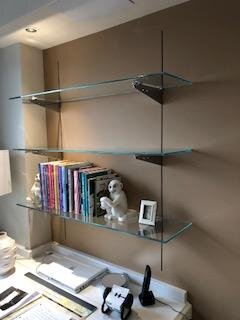
SHELVES – THE FLOATING GLASS DETAIL

SHELVES – THE FLOATING GLASS DETAIL
By Bob King on Apr 3, 2018 8:00:00 AM
We have lots of shelving details which feature a concealed support, usually embedded inside the wall structure and from there inserted into the shelf using a bracket or mortised spline of some sort or another – all good, but not with glass. Since glass is a transparent solid. No manner of structure can be easily concealed within it. To mitigate this issue, we use a semi-concealed metal bracket system readily available online or from better hardware stores. The system we use is by GARCY HARDWARE that we order online here in NYC. Here’s link we use:
http://www.davesanders.com/catalogdownload/sect11.pdf
To get the “floating look”, the wall standard must first be concealed in the wall and securely attached as needed for the type of wall construction holding the standard. We used GARCY’s Super Heavy Duty Concealed Standard #GY148272 (6 foot long) and then cut to our custom length onsite. This standard has a concealed depth suitable for the 5/8ths inch thick drywall we used to laminate over the existing wall finish. They are available in sizes smaller & larger to accommodate various thicknesses of whatever wall finish you may be considering using, such as a fabric wrapped panel, mirrors, stone slab or wood paneling among others.
Drywall is the trickiest finish, in my opinion, as the plaster skim coating has to really be plumb, flat & clean (Level 5). Once this is in place & the wall painted, just snap in the appropriate metal brackets.
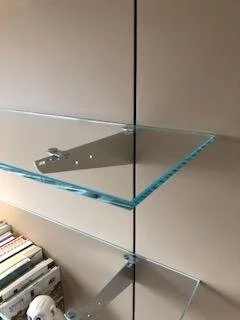
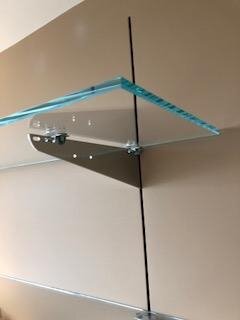
I used an 8 inch simple metal bracket (for 10 inch shelf) in this photo (no “cam” feature) onto which is attached the M276 Shelf clips and GY105 Rubber Cushions. What’s nice about this is that the Cushions are really just little suction cups that hold the glass in place so you don’t have to be concerned about anything slipping out of place. The glass is clear 3/8ths inch clear STARFIRE tempered with a square beveled & polished edge. This glass is perfectly “clear” without the green tint of regular glass, but that’s for another blog.
The total cost of the parts (less the glass) was under $150.00, so if you’re handy, this is good a DIY project!